
Affiliate disclosure: some links are affiliate links — as an Amazon Associate we earn from qualifying purchases, at no extra cost to you. Full disclosure.
Most propane heaters need very little beyond fuel to keep running for years. When something does go wrong, it’s usually one of a small handful of parts. Here’s what fails most often, across brands, and what replaces it.
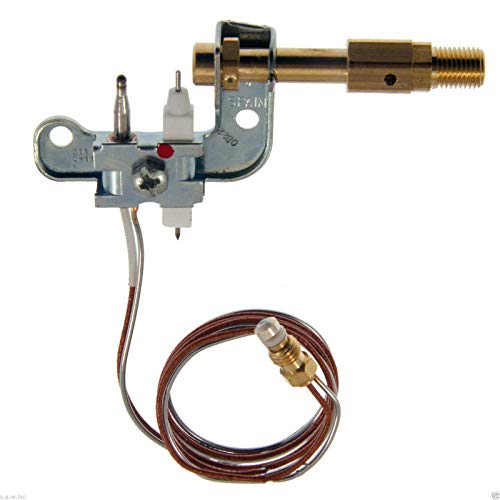
Best for A vent-free wall or cabinet heater whose pilot won't stay lit
- Universal fit across several vent-free brands
- Includes ODS function
- Direct pilot replacement
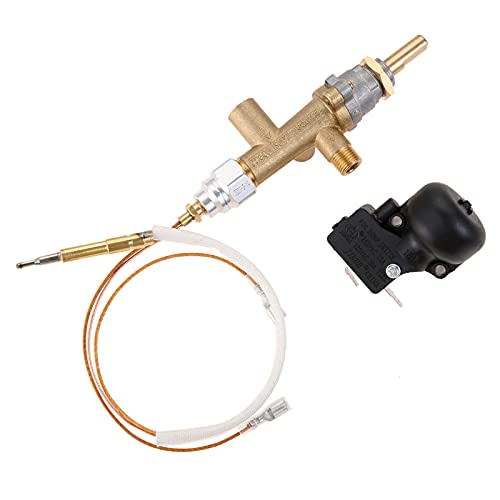
Best for A tank-top or patio-style heater with weak flame or ignition trouble
- Includes thermocouple
- Includes safety shutoff
- Fits common tank-top models

Best for Any Buddy-series heater hose-connected to a refillable tank
- Genuine Mr. Heater part
- Protects the regulator from debris
- Simple inline install
Pilot and ODS Assemblies
On a vent-free wall or cabinet heater, the pilot assembly houses the oxygen depletion sensor. If the pilot won’t stay lit, or the ODS seems to trip more often than it should, this is the part most likely at fault after years of regular use. A universal vent-free pilot assembly fits a range of models across several brands, though you should always confirm compatibility with your specific model before ordering.
Control Valves and Thermocouples
On tank-top and patio-style heaters, the control valve and thermocouple assembly is the part most likely to need replacement. A thermocouple that takes longer than usual to hold the pilot lit is often close to the end of its working life. Both parts are inexpensive relative to the cost of a new heater, and this is a repair many owners handle themselves.
Fuel Filters
Any heater hose-connected to a refillable tank benefits from an inline fuel filter, which catches debris a sealed disposable cylinder never introduces. This isn’t a "failed part" so much as ongoing protection, and it’s worth replacing on its own maintenance schedule rather than waiting for a symptom to appear.
Repair or Replace: A Simple Rule
A worn pilot assembly, thermocouple, or control valve is almost always cheaper to replace on its own than to replace the whole heater. Doing so extends a well-built unit’s working life by years. A cracked burner housing or a failed fan motor on a forced-air model is a bigger repair. At that point, compare the repair cost against a new unit’s price before committing.
Genuine vs. Universal Parts
For safety-relevant components, an ODS pilot assembly or a thermocouple, a part rated for your specific model is worth the extra cost. Fit and calibration affect how reliably the safety system actually works. For non-safety accessories, a case, a stand, a cover, a universal option is a reasonable way to save money.
Certification Marks to Look For
Any gas-carrying replacement part — a pilot assembly, a control valve, a thermocouple — should carry a CSA or UL listing mark on its housing or packaging. That mark means the part was independently tested for propane service at its rated specs. It isn’t just a generic component adapted from a different application. This matters most for safety-relevant parts handling fuel flow or the pilot safety circuit. It matters less for a purely mechanical accessory, like a case or stand, that never touches the gas path.
Step-by-Step: Replacing a Control Valve Assembly Safely
Shut off the fuel supply completely and disconnect the tank or cylinder before touching any gas-carrying part. Remove the old assembly following your model’s manual. Note how the thermocouple and any wiring are routed, so the new part goes in the same way. Install the replacement, hand-tightening threaded connections first, adding a wrench turn only where the fitting calls for it. Reconnect the fuel supply, then brush a soapy-water solution over every connection you touched. Bubbles mean a leak — tighten that connection and retest. Only light the pilot once every connection tests clean and dry.
Building a Basic Parts Kit
For anyone running a heater regularly through a full season, a sensible starting kit covers three things: a genuine hose assembly, a spare thermocouple or pilot assembly matched to your specific model, and a working tank with a current OPD valve. This covers the most common points of failure without overspending on parts you may never need.
Signs a Part Needs Replacing Soon
A hose that feels stiff or shows surface cracking when flexed is due for replacement before it fails outright. A thermocouple that’s slow to hold a pilot lit is often near the end of its service life. Catching these signs early, rather than waiting for a full failure, keeps a minor part swap from turning into an unplanned trip mid-season with a heater that won’t run.
Tools Worth Having on Hand
An adjustable wrench, a small flathead screwdriver, and a soapy-water leak test kit cover most basic maintenance and part swaps across brands. Nothing here requires specialized equipment, and a basic home toolkit is enough for swapping a thermocouple, hose, or pilot assembly, provided you follow your specific model’s manual for the exact steps.
Keeping Spare Parts on Hand
For a heater used through a full winter, keeping one spare thermocouple or pilot assembly on hand avoids a multi-day wait for shipping if the original fails during a cold snap. This is a small upfront cost for meaningful peace of mind, especially for a heater relied on for a job site or an unheated workshop.
Sourcing Parts for Discontinued Models
An older heater no longer sold new can still have parts available through official channels for years after discontinuation. Check the manufacturer’s parts lookup by model number before assuming a part is unavailable. If a genuine part truly can’t be found, a compatible universal part is the fallback, checked carefully against your unit’s specifications first.
What Not to Improvise
Never substitute a generic hose or fitting not rated for propane use, even temporarily, since pressure and material requirements differ across gas applications. Never bypass a safety component like the ODS or a tip-over switch to keep a heater running through a fault. These are the two places where improvising to save time introduces a real safety risk rather than just a performance tradeoff.
Common Mistakes When Replacing Parts
The most common mistake is buying a universal part for something genuinely safety-relevant, like an ODS pilot assembly. A model-specific part fits and calibrates more reliably. A second mistake is skipping the soapy-water leak test after a repair because the swap "looked simple." That’s exactly the assumption that lets a loose fitting go unnoticed. A third is not noting how the old part was routed before removing it. That turns a straightforward swap into guesswork during reinstallation.
A Seasonal Parts Checklist
Before the first cold night of each season, run through a short checklist: inspect the hose for cracking, confirm the tank’s OPD valve and recertification date, check the thermocouple’s response time when lighting, and clean any dust or debris from the burner assembly. This five-minute habit catches most small issues before they turn into a mid-winter breakdown.