
Affiliate disclosure: some links are affiliate links — as an Amazon Associate we earn from qualifying purchases, at no extra cost to you. Full disclosure.
A tip-over switch is a mechanical safety feature that shuts a heater’s gas valve off automatically if the unit is knocked over or tilted past a set angle. For the full mechanical explanation, see our how it works guide. This page covers what to do if yours needs attention.
Is the Switch Repairable?
On most portable heaters, the switch is built into the control valve assembly. It isn’t sold as a standalone part. A failed switch usually means replacing the whole assembly, not just the switch mechanism by itself.
Signs the Switch Isn’t Working
- The heater stays lit when tilted or knocked over — this is a serious malfunction, not a minor issue. Stop using the heater immediately.
- Visible damage or obstruction around the base where the mechanism sits — dust, debris, or a bent housing can interfere with normal movement.
- The heater shuts off from very minor bumps that shouldn’t trigger it — this suggests the mechanism may be overly sensitive or damaged, worth having checked even though it’s erring toward caution rather than failing dangerously.
How This Gets Tested and Rated
Portable propane heaters sold in the US follow gas-appliance safety standards. These require some form of automatic shutoff if the unit tips past a set angle. The manufacturer tests this, and it’s verified through independent listing before the model reaches retail. The exact mechanism varies by maker. Some use a weighted ball-and-plunger design that blocks the gas path when tilted. Others use a different mechanical setup. The functional rule is the same across the category: gas flow stops automatically well before the heater is fully upside down. That’s why the switch is built into the control valve rather than sold as a separate accessory. It’s a certified safety function of the whole assembly, not an add-on part.
Step-by-Step: Testing Your Switch Safely
Disconnect the heater from its fuel source completely before testing. With no gas connected, tilt the unit slowly past the angle in its manual, or steadily until it would naturally tip in normal use. Confirm the internal mechanism engages — you may hear or feel a small click or shift. Reset the heater to upright and reconnect fuel only after confirming the mechanism reset properly. Never test this with the heater lit and fuel flowing. The whole point of the test is confirming the shutoff works before you rely on it during real use.
Replacing the Control Valve Assembly
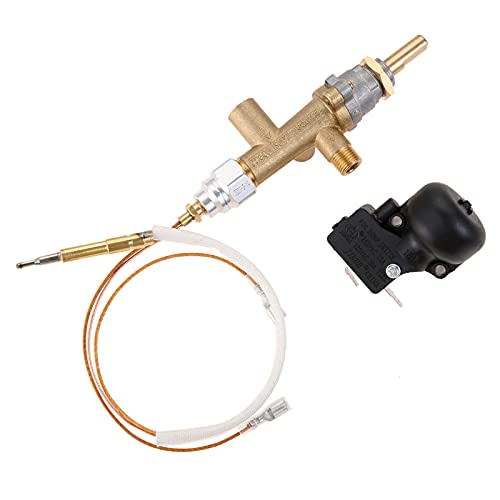
A replacement control valve and safety assembly, like the option above, is the typical fix when a tip-over switch fails on a permanent or tank-top style heater. This is a job many owners handle themselves with basic tools, though anyone not confident working with gas fittings should have a qualified technician complete the swap instead.
When to Retire the Heater Instead
If a heater is old enough that a replacement control valve assembly costs a significant fraction of a new heater’s price, replacing the whole unit is often the more sensible choice. This is especially true for a heavily used portable model, where other components may also be approaching the end of their working life around the same time.
Never Bypass a Tip-Over Switch
Taping down, wedging, or otherwise disabling a tip-over switch to keep a heater running on an intentionally tilted surface removes the one mechanical safeguard against an unattended flame burning against something flammable. This should never be done, even temporarily, regardless of how inconvenient a working switch feels in the moment.
Checking Before You Buy a Used Heater
If you’re considering a used propane heater, test the tip-over switch first. Tilt the unit carefully, with no fuel connected, and confirm it responds. A heater with a confirmed non-functional switch is not a safe purchase at any price. This is a safety-critical part, not a cosmetic one.
Where This Fits With Other Safety Features
A tip-over switch is one of three layered safety systems on most indoor-safe heaters, alongside an oxygen depletion sensor and an added fuel odorant. Our full mechanical explainer covers how all three work together, and why none of them substitutes for the others.
Cost of a Replacement Assembly
A replacement control valve and safety assembly typically costs a small fraction of a new heater’s price for a portable or tank-top model. This makes repair the more sensible option in most cases, provided the rest of the heater is otherwise in good working condition. Weigh the repair cost against a new unit before deciding, rather than assuming replacement parts are always the cheaper path.
A Note for DIY Repairs
Anyone comfortable with basic tools can typically handle a control valve assembly swap. Disconnect the fuel supply fully first. Confirm the replacement part matches your specific model before starting. Run a soapy-water leak test on every new connection before ever lighting the heater again, since this catches an improperly seated fitting before it becomes a real problem.
Keeping a Spare Assembly on Hand
For a heater used regularly through a full winter, keep a spare control valve assembly on hand. This avoids a multi-day wait for a replacement part if the original fails mid-season. It’s a small upfront cost for real peace of mind, especially for a workshop or job site heater, where going without heat for several days has a real practical impact.
A Word on Older, Discontinued Models
Finding a replacement assembly for an older, discontinued model can take more searching than for a current one. Check the manufacturer’s parts lookup by model number first. If a genuine part truly can’t be found, a universal assembly rated for a similar BTU output is a reasonable fallback. Check it carefully against the original unit’s specifications before ordering.
Final Thoughts
A tip-over switch is a small, unglamorous part that rarely gets attention until it stops working, at which point it becomes the most important part on the heater. Treat any doubt about its function seriously, keep a spare on hand for a heavily used unit, and never work around a confirmed failure with tape, wedges, or hope. When in doubt, replace the part rather than gamble on a component built specifically to prevent fire risk.