

Affiliate disclosure: some links are affiliate links — as an Amazon Associate we earn from qualifying purchases, at no extra cost to you. Full disclosure.
A portable propane heater works straight out of the box. A diesel heater does not. Here is exactly what a real installation involves, from parts to first startup.
Top 3 Recommended
What You Will Need Beyond the Heater Itself
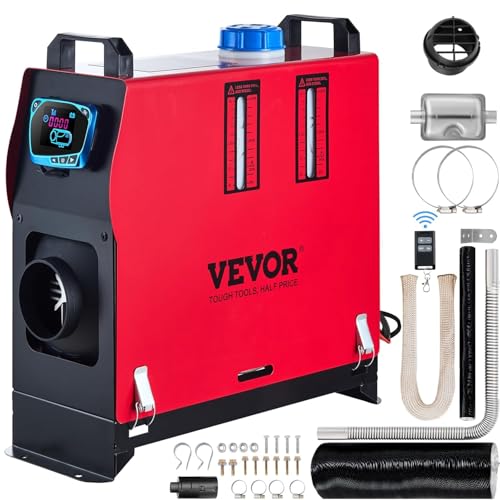
Most kits include the core unit. Budget for a few extras. You will need fuel line and fittings sized for your model. You will also need an exhaust pipe with heat-shielding material. Add wire of the correct gauge for your run length, plus an inline fuse matched to the heater’s draw. Basic tools help too: a drill, wire crimpers, and a multimeter for testing connections.
Step One: Choose a Mounting Location
Pick a spot with enough clearance for the intake, outlet, and service access. For a vehicle or RV, an underbelly compartment is common. For a garage, try a wall or floor mount away from combustibles. Check that the location allows a short, straight run for both fuel line and exhaust. Long, winding runs make the install harder and can hurt performance.
Step Two: Mount the Unit Securely
Diesel heaters vibrate slightly during operation. Secure mounting matters more than it might seem. Use the manufacturer’s specified hardware and pattern. Do not improvise here. A loose mount can stress the fuel line and exhaust connections over time. That is a preventable failure point.
Step Three: Run the Fuel Line
Route fuel line from the tank to the heater’s fuel inlet. Some setups use a small dedicated tank. Others tap the vehicle’s main tank, depending on compatibility. Keep the line clear of sharp edges and moving parts along its entire route. Most manufacturers specify a maximum fuel line length. Some also require a specific angle for the fuel pump to work correctly. Check your model’s manual before finalizing the route.
Step Four: Route the Exhaust
This is the most safety-critical step. Route the exhaust pipe completely outside the vehicle or structure. Keep it away from windows, vents, wheel wells, and any point where exhaust gas could re-enter the space. Wrap the pipe in heat-shielding material anywhere it passes near flammable materials or fuel lines. Our exhaust venting requirements guide covers the full rules in depth.

Step Five: Wire the Power Connection
Connect to a 12V or 24V power source matched to your heater’s rating. Size the wire gauge for the current draw and run length. Undersized wire is a common cause of voltage drop and unreliable starting. Install an inline fuse close to the power source, not just at the heater end. Route wiring away from the exhaust pipe and any source of chafing.
Step Six: Install the Control Panel
Most kits include a control panel or app-based interface. Mount it inside the cabin or living space, connected back to the heater by a control cable. Pick a spot that is convenient to reach. Route the control cable separately from the main power wiring where possible. This reduces interference.
Step Seven: Bleed the Fuel Line
A new installation has air in the fuel line. That air needs to clear before the heater runs correctly. Most units handle this automatically over a few startup attempts. Some manuals specify a manual bleed procedure instead. Expect the first couple of starts to fail or run rough while air works its way out. This is normal for a first install. It is not a sign of a problem.
Step Eight: First Test Run
Run the heater at a low setting for the first test. Watch for fuel leaks at every connection. Listen for unusual noise from the fan or pump. Confirm the exhaust exits cleanly outside with no visible leaks at any joint. Let it run a full cycle, including shutdown and cool-down, before calling the install complete.
Common DIY Installation Mistakes
Undersized wiring causing voltage drop is the most frequent mistake. Exhaust routed too close to a window or vent is another. Insufficient heat-shielding near other components is a third. A fourth common mistake is panicking during the normal rough-start period of the bleed step, assuming something is broken when it is not. Reading the full manual before starting, rather than working from general knowledge of a similar unit, avoids most of these.
Tools Worth Having on Hand Before You Start
Beyond the basics, a wire stripper, heat-shrink tubing, and a small torque wrench make the job noticeably easier. A soapy-water solution in a spray bottle helps check fuel connections for leaks before the first real test run. None of these are strictly required, but each one saves real time during the install.
When to Hire a Professional Instead
If you are not comfortable with 12V electrical work, cutting exhaust routing through a vehicle’s underbody, or working with fuel lines, a professional installer is worth the cost. A poorly executed DIY exhaust or fuel connection is a genuine safety risk. The labor cost of a professional install is modest compared to the heater’s own price.
How Much a Professional Installation Typically Costs
Professional installation costs vary by shop, region, and vehicle type, but budget for several hours of labor on top of the parts list above. Getting a quote before buying the heater helps you compare the full installed cost against the DIY route, rather than deciding purely on the unit’s sticker price.
Documenting Your Own Installation
Take photos of the fuel line, exhaust route, and wiring before closing everything up. This is useful for warranty claims, for a future repair, and for anyone else who might work on the system later. A few minutes with a phone camera saves real guesswork if something needs troubleshooting months or years down the road.
Installing in a Garage vs. a Vehicle
A garage installation is generally easier than a vehicle install, since you have more room to work and don’t need to route anything around existing vehicle components. Mounting to a wall or a stable floor stand, running fuel line from a dedicated tank, and venting through an exterior wall follow the same core steps, just with fewer space constraints than working inside a vehicle’s underbelly.
Working With an Existing Vehicle Wiring Harness
Some installers tap into an existing accessory circuit rather than running a fully independent power line. This can work if the circuit has enough spare capacity, but always verify the rating first. Overloading an existing circuit is a fire risk that a dedicated line avoids entirely.
Sourcing Parts Locally vs. From the Kit
Most kits include enough fuel line, wire, and exhaust pipe for a typical install, but a longer run than expected can leave you short. Local auto parts and hardware stores carry compatible wire gauges and fittings in a pinch, though matching the manufacturer’s specified exhaust pipe diameter and material usually means ordering direct rather than substituting a generic part.
Post-Installation Maintenance Checks
After the first few weeks of use, recheck all fuel line and exhaust connections for tightness. Normal vibration can loosen fittings that seemed secure at install. Inspect wiring for chafing against the vehicle frame or other components. This early recheck catches most installation-related issues before they grow into bigger problems.
The Bottom Line on Installation
A diesel heater installation is a genuine weekend project for someone comfortable with basic mechanical and electrical work. It is also a straightforward job for a professional installer. Rushing the exhaust routing or the wiring is where most problems start. Take the time to do those two steps correctly, and the rest of the installation is manageable.